I’m going to keep this brief because in the morning of my one day off this week I started seeing halos and then my vision went into that completely fractured migraine vision. Looking at a screen for more than 5 minutes at a time still splits my head in two, but the show must go on! Luckily I have a guest blog post from my brother and sister in law that I’ve been meaning to show you! It’s actually perfect for the current circumstances where everyone is looking for something to do remotely. We had so much fun playing at Christmas, it was such a blast, but I’ve ruined too much already! Read on!
Hi, Lady Beekeeper readers! This is a guest post by Lexi’s brother and sister-in-law, Mark and Erin. Lexi generously invited us to share one of our recent DIY projects with you.
Every year on Christmas Eve, the Collins siblings stay up late and play Mario Party–specifically, Mario Party 3 for the Nintendo 64 (this is a detail only the Collins kids themselves would appreciate). The tradition continues even after we all grew up, went off to college, found our significant others, and had kids. Unfortunately this year, we (Mark and Erin) were unable to attend the yearly festivities in Rhode Island due to the impending birth of baby Artemis. We didn’t want to miss out on this most sacred of Collins Christmas traditions and we didn’t have an online emulator that we could use to play as a group in 3 different locations, so we had to improvise. Erin researched Mario Party statistics, re-calibrated the game mechanics, and designed the board. Mark did the artwork, wrote up the rules, and provided true insider knowledge of elements crucial to the game (basically, a lot of gimmicks that make the game more about luck than skill). We both had a lot of fun creating the mini-games!
Once the game was finished, we mailed identical versions of the board and supplies to the other players—one set for each couple. Everyone was told to look out for a mysterious envelope in the mail. Unfortunately we did not take into account that Lexi, Will, and Julius were spending Christmas in Rhode Island. Poor Will had to drive all the way back to Massachusetts to collect a plain Manila envelope from their mailbox. Thanks, Will!
All in all the game was a success (at least we think so)! The mini-games were a hoot and, after the post-game stars were awarded, Bailey (as Donkey Kong) was our Mario Party Champion!
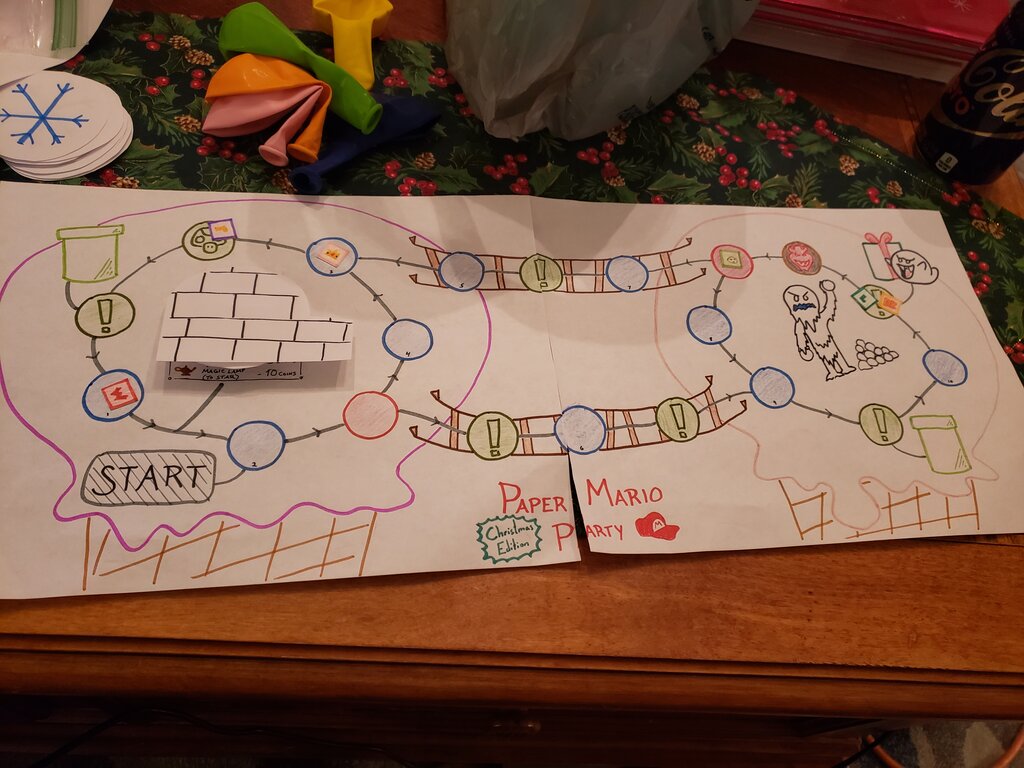
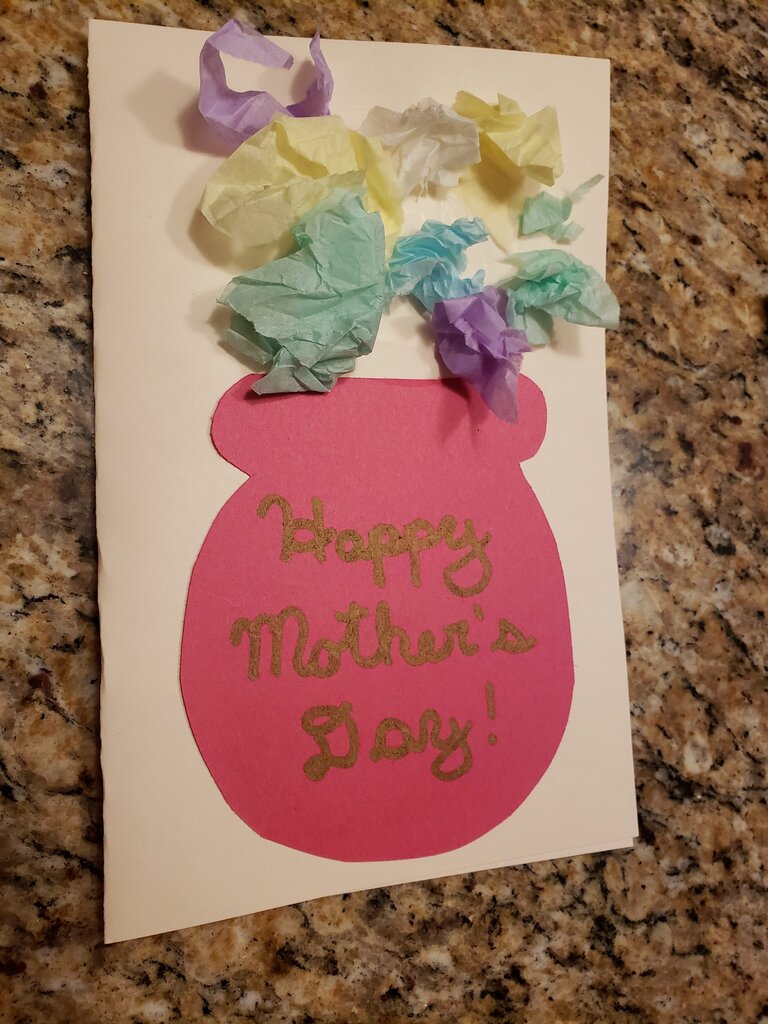
Paper Mario party board with playing pieces and assorted paraphernalia.
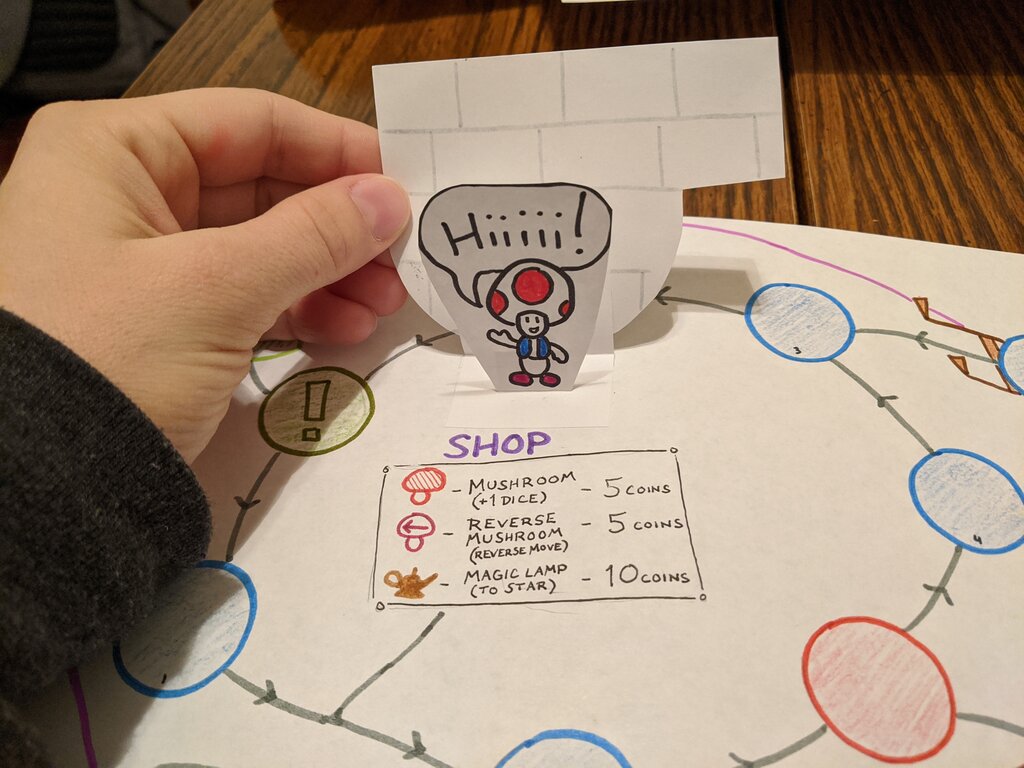
Game board came complete with Item Shop and Toad!
Paper Mario Party: Christmas Edition
Step 1: The Board
A standard Mario Party game is 10 rounds. This seemed a bit ambitious for a game played over a three-way phone-call, so we cut our version down to 5 rounds. We looked at some of the standard Mario Party 3 boards and decided to use 20 spaces (10 blue, 2 red, 5 event spaces, and 1 Bowser space). Our board also included an Item Shop and a Start space, but players only pass through these spaces and cannot actually land on them. In honor of Christmas, we designed the board with frosty ice cream cones and a disgruntled, snowball-throwing yeti. We mapped out the route and tried to evenly distribute all the spaces. We also gave everyone 10 starting coins (the cost of a star) so that things would move quickly.
Since he was hand-drawing three identical game boards, Mark used two pieces of 8.5 x 11 printer paper. He also added an Item Shop with a pop-up Toad, saying his signature: “Hiiiiiiiii!”
Step 2: The Rules
To keep things fair, we typed up a set of rules and sent them to all the participants when we started the game. The rule book had explanations for how the star location moved, what happened on different event spaces, what the Bowser space entailed, what to do if a player landed on a space with another player, and how stars would be awarded at the end of the game. Most of these actions involved dice rolls to keep everything fair. The official rule book is included here with this post.
Step 3: The Mini-Games
In between each round of Mario Party, there is a short mini-game. Some mini-games are team-based, some are 1-vs-all, and some are free-for-alls. Below are the mini-games that we chose for Paper Mario Party. Most minute-to-win-it games would work. You can really pick whatever minute-to-win-it game looks fun to you or whatever game you happen to have the supplies for.
Mini-Game #1: Santa-Grams (Free-for-All)
Basically, this mini-game is a simple Christmas-themed tangram challenge. Each player is given a set of tangram shapes, then a tangram shape silhouette is revealed (ours was a Christmas tree!). The first player to replicate the shape with all their tangram pieces wins!
Materials (per person):
- 1 set of tangram shapes. These are easy to find online, print out, and cut up.
- 1 tangram shape silhouette. Again, there are tons of examples online. Mark selected one because he has the worst memory, so would be least likely to remember the solution!
Mini-Game #2: Snowball Fight (Teams)
In this mini-game, team members must stand fingertip to fingertip facing each other. Players have 30 seconds to catch as many ice cubes in the measuring cup as possible. The trick is that the teammate with the ice cubes is only permitted to spit them towards the cup that the second player holds. The team to get the most ice cubes in their cup in the time limit wins!
Materials (per team):
- 1 standard 1-cup measuring cup. Really, any cup would work, but we figured this was a standardized kitchen appliance that everyone owns.
- 1 bowl of ice. The winning team got an absurdly high final score, so we recommend putting a lot of cubes in your bowl!
- maybe some towels?
Mini-Game #3: Bouncing Baubles (Free-for-All)
The objective of this mini-game is to keep 3 balloons in the air as long as possible using only one hand. (This was significantly more difficult than originally expected!) Players are eliminated until the last one with all three of their balloons in the air wins!
Materials (per person):
- 3 balloons. Bonus points if they are fun colors and resemble Christmas ornaments!
Mini-Game #4: I’m Dreaming of a [Blank] Christmas (1-vs-All)
This mini-game is modeled after the party game “What is Yours Like?”. In this version, the guesser leaves the room, while the clue-givers are given 3 categories and must come up with short descriptions to accurately describe what their thing is like without being too obvious. The guesser must correctly identify the category based only on their descriptions–best 2 out of 3. Lexi was our guesser, so she left the room. In keeping with the Christmas theme, our categories were: your stocking, your Christmas tree, and your favorite day of “The 12 Days of Christmas”. The clues for “The 12 Days of Christmas” included things like: “mine is the bird in the fruit tree” (Partridge in a Pear Tree), “mine is for some reason bigger and louder than all the rest” (Five Golden Rings), “mine is foreign fowl” (Three French Hens), “mine is a gestating gaggle” (Six Geese A’Laying). Lexi was a champ and managed to discover all three categories!
Materials:
- Nothing! Just pick out some fun categories.
Mini-Game #5: Snow Job (Teams)
In this mini-game, each team must place their pile of “snowflakes” (really, small circles of paper) on one surface and the official “snowflake landing pad” on another with a standard measure of string to mark the distance between the two. The first player picks up the snowflake and passes it to their teammate, who deposits it on the landing pad. The tricky part is that both players are only allowed to use their mouths! The team to get the most snowflakes on the snowflake landing pad in 30 seconds wins. Note: This game involved so much laughing that one team did not successfully move a single snowflake! (edit by Lexi: that team was Will and I, I just could not handle it.)
Materials (per team):
- 1 snowflake landing pad. For this, we used an 8.5 x 11 piece of paper that Erin decorated to say “Snowflake Landing Pad.”
- 11 snowflakes. Erin cut out 3-inch diameter circles from printer paper with fabulous snowflake designs. Poster board was originally tested, but it proved too heavy.
- 1 piece of string. The length isn’t super important as long as all teams have the same length. We very scientifically measured the distance from our kitchen table to the kitchen counter as the standard distance, so our string was about 10 feet.
Step 4: The Game Pieces
We made small tokens for each character out of poster board and decorated them with symbols or initials that matched our chosen characters. We kept these pretty small so that they would fit nicely on the spaces. Our game included the characters: Mario, Luigi, Peach, Yoshi, Waluigi, and Donkey Kong.
While it wasn’t quite the same as playing old-school Mario Party 3 at the Collins family home with a couple of broken controllers, Paper Mario Party was a rousing success. (Plus, everyone could play, not just 4 people at a time!)
Disclaimer: All Mario Party names, images, and references are solely the property of—please don’t sue us, Nintendo!


